The first time I tried growing a tomato plant, I made every rookie mistake in the book. I grabbed a generic, oversized heirloom beefsteak variety, shoved it into a cheap 6-inch plastic pot filled with heavy mud straight from my backyard, and shoved it onto a shady corner of my patio.
Unsurprisingly, it was a disaster. The plant stretched out into a pale, sickly string, the pot dried out into a concrete block within three hours of sun exposure, and I ended up with zero tomatoes and a very expensive mess.
I almost gave up on container gardening right then and there. But I was stubborn. I wanted fresh, vine-ripened tomatoes, and I didn’t have a massive backyard farm.
The turning point came when I stopped treating containers like tiny yards and started understanding how pots actually function. Can you grow tomato plants in pots? Yes, absolutely. In fact, when you get the details right, container-grown tomatoes often out-produce and out-flavor in-ground plants because you have total control over soil nutrition, pest management, and heat retention.
If you want to pull armloads of sweet, juicy tomatoes off compact plants on a patio, balcony, or sunny porch, this guide covers everything I have learned through years of trial, error, and heavy harvests.
Why Growing Tomatoes in Pots Actually Works Better
Before diving into varieties and soil mixes, it helps to understand why containers are a secret weapon for tomato growers:
-
No Soil-Borne Diseases: Traditional garden beds often harbor fungal spores, nematodes, and blight pathogens that splash up onto leaves. Fresh, sterile potting mix in a pot eliminates these issues from day one.
-
Faster Soil Warmth: Pots absorb heat from the sun much faster than cold ground earth in early spring. This means you can get your plants outdoors and growing aggressively weeks ahead of traditional in-ground schedules.
-
Total Mobility: If a sudden heatwave threatens to cook your plants, or a violent late-spring storm rolls through, you can slide your pots into protected shade.
Choosing the Right Tomato Variety: The Most Important Step
The single biggest mistake beginners make is picking the wrong tomato variety for a pot. If you buy a massive, rambling indeterminate heirloom vine that wants to grow 8 feet tall and plant it in a small pot, you are setting yourself up for failure.
To succeed with containers, you must choose varieties bred for the job. Tomatoes generally fall into three growth habits:
1. Micro-Dwarf and Patio Varieties (Best for Small Pots & Balconies)
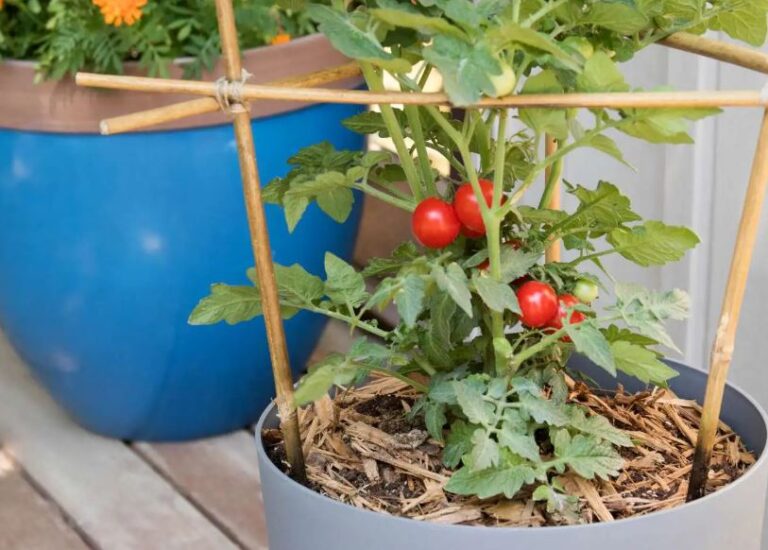
These plants stay remarkably small—usually between 8 to 18 inches tall—and naturally fit into compact containers.
-
Tiny Tim: A classic micro-dwarf that produces heavy clusters of sweet, red cherry tomatoes on a plant that rarely exceeds 12 inches.
-
Orange Hat: Bright orange, sweet bite-sized fruit on a tidy, low-growing plant that thrives in small spaces.
-
Patio Hybrid: Sturdy, compact bush plants that produce standard slicer-sized tomatoes without sprawling everywhere.
2. Determinate Bush Varieties (Best for 5- to 10-Gallon Pots)
Determinate tomatoes grow to a specific, predetermined bush height (usually 3 to 4 feet), set all their fruit over a concentrated multi-week window, and then finish. They don’t require heavy pruning and stay neat in large containers.
-
Bush Early Girl: Delivers classic, medium-sized red slicing tomatoes on a compact bush frame.
-
Totem or Husky Cherry Red: Dense, disease-resistant plants loaded with flavorful cherry fruit.
3. Indeterminate Vining Varieties (For Large Tubs & Experienced Growers)
Indeterminate tomatoes grow, flower, and vine continuously until the first autumn frost. You can grow them in pots, but they demand large containers (15 to 20+ gallons) and heavy-duty staking.
-
Sungold: The undisputed king of sweet, golden-orange cherry tomatoes. If you give it a large 15-gallon pot and a sturdy trellis, it will reward you endlessly.
Selecting the Right Container: Size, Material, and Drainage
Tomatoes have massive, aggressive root systems. If you restrict their roots, the plant will stunt, dry out in minutes, and fail to set fruit.
The Golden Rule of Pot Sizing
-
Micro-Dwarf Varieties: Minimum 1- to 2-gallon pot (about 8 to 10 inches wide).
-
Determinate Bush Varieties: Minimum 5- to 7-gallon pot (12 to 14 inches wide and deep).
-
Large / Indeterminate Varieties: 10- to 20-gallon container or fabric grow bag (18 to 24 inches wide).
Container Materials Compared
-
Fabric Smart Pots (Geotextile Bags): These are my absolute favorites for tomatoes. The porous fabric “air-prunes” roots when they reach the edge, preventing root-binding, while providing exceptional oxygen flow to the root zone. They never waterlog.
-
Plastic Pots: Lightweight, affordable, and retain moisture longer than fabric or clay. Make sure they are food-safe plastic. Avoid solid black plastic if you live in an ultra-hot desert climate, as it can overheat the soil.
-
Terracotta and Ceramic: Beautiful, but heavy. Terracotta wicks moisture rapidly through its walls, meaning you will need to water twice a day in peak summer.
The Drainage Mandate
Every single container must have active drainage holes at the base. Do not place gravel or rocks at the bottom of the pot; physics creates a perched water table that actually keeps the soil wetter directly above the stones. Just fill the pot with your medium straight down to the base.
The Soil Secret: Why Yard Dirt Fails in Pots
Never shovel native soil or garden bed dirt into a tomato pot. Garden soil compresses inside containers, turning into dense, suffocating mud that blocks oxygen from reaching the roots.
Tomato plants need a fluffy, sterile, high-performance soilless potting mix. Over the years, I have settled on a custom blend that never fails:
-
40% Coconut Coir or Sphagnum Peat Moss: Holds vital moisture without becoming soggy.
-
40% Perlite or Vermiculite: Creates microscopic air channels, ensuring superior root aeration and fast drainage.
-
20% Aged Compost or Worm Castings: Introduces rich organic matter, beneficial microbes, and a gentle base of slow-release nutrients.
Step-by-Step Planting Guide: How to Bury Your Tomato Deep
Tomatoes have a superpower that most other plants lack: they can grow roots all along their stems. When you plant a tomato, you should never plant it at the same depth it sat in its nursery container.
Sunlight and Location Requirements
Tomatoes are sun worshippers. You cannot successfully grow heavy-fruiting tomato plants in a dark, dim indoor corner or a fully shaded northern balcony.
-
The 6-to-8 Hour Rule: Position your tomato pots in a location that receives a minimum of 6 to 8 hours of direct, unfiltered sunlight daily. South- or west-facing balconies, patios, and open sunny yards are ideal.
-
Managing Urban Microclimates: If your pots sit on a concrete balcony or asphalt driveway, keep in mind that those surfaces absorb daytime heat and radiate it back upward. While tomatoes love warmth, extreme heatwaves can cook container roots. Elevate your pots slightly on wooden blocks or feet to allow air circulation underneath.
Watering: The Rhythm of Container Success
In the ground, a tomato plant can tap deep moisture reservoirs during dry spells. In a pot, soil dries out exponentially faster under wind and sun. Mismanaged water is the single biggest cause of container tomato failure.
My Routine for Watering Potted Tomatoes:
-
The Finger Test: Never water on a strict calendar schedule. Shove your index finger deep into the soil past the second knuckle. If it feels dry down there, it’s time to water. If it still feels moist, check again tomorrow.
-
Soak to Drain: When you water, do it slowly and deeply until water streams freely out of the bottom drainage holes. A quick splash on the surface only tricks you into thinking the plant is hydrated while the root zone stays bone dry.
-
Timing Matters: Always water early in the morning ($6\text{ AM}$ to $9\text{ AM}$). This arms the plant with hydration before the afternoon sun peaks. Avoid evening watering, which leaves foliage wet overnight and invites fungal blights.
Feeding Your Heavy Feeders
Because you water containers frequently, soluble nutrients wash out through the drainage holes over time. A potted tomato is entirely dependent on you for food.
-
Base Feeding: As covered during planting, mix slow-release organic fertilizer into your soil.
-
The Liquid Regimen: Starting about three weeks after planting, feed your containers every 7 to 14 days with a water-soluble, organic liquid fertilizer designed for tomatoes and vegetables (rich in phosphorus and potassium to encourage blossoms and fruit set, rather than just green leaves).
Support Systems: Cages, Stakes, and Trellises
As your tomato plant grows and sets clusters of heavy fruit, it will become top-heavy. If unsupported, the branches will snap under the weight.
-
Install Early: Always set your tomato cage, stake, or trellis into the pot at the time of planting. Trying to jam a wire cage into a pot later will sever established root systems.
-
Wind Anchoring: In high winds, large tomato pots can act like sails and tip over. If you live on a windy high-rise balcony, tie your stakes or cages securely to a nearby railing, or use heavy-duty fabric bags that resist tipping.
Pruning and Maintenance for Maximum Yield
Pruning container tomatoes keeps them manageable, improves airflow, and directs the plant’s energy toward ripening fruit rather than growing wild leaves.
-
Determinate Bush Types: Require minimal to no pruning. Let them bush out naturally.
-
Indeterminate Vining Types: You must manage their “suckers”—the small shoots that emerge in the “V” joint between the main stem and side branches. Pinch out most suckers on indeterminate plants if you are training them to a single or double stake, leaving just enough foliage to shade the fruit from sunscald.
Troubleshooting Common Container Issues
-
Blossom-End Rot: That ugly, sunken black patch on the bottom of your ripening tomatoes. It isn’t a disease; it’s a physiological disorder caused by inconsistent watering. When a plant swings wildly between drought and flood, it cannot take up calcium properly. Maintain a steady, even moisture routine.
-
Fungus Gnats: Small black flies buzzing around damp potting soil. Let the top two inches of soil dry out completely between waterings, and use sticky yellow traps near the base.
-
Yellowing Lower Leaves: Often a sign that the plant has outgrown its nitrogen supply. Give it a hit of liquid organic fertilizer and check if it’s due for a larger pot next season.
Frequently Asked Questions
What is the absolute best pot size for a tomato plant?
For standard or determinate tomatoes, a 5- to 10-gallon container (or 12- to 18-inch diameter pot) is the sweet spot. For micro-dwarf varieties, a 1- to 2-gallon pot works wonderfully. For massive indeterminate heirlooms, aim for 15 to 20 gallons.
Can I grow tomatoes in 5-gallon buckets from the hardware store?
Yes! Five-gallon plastic buckets make fantastic, budget-friendly tomato containers. Just ensure you drill at least six to eight $1/2$-inch drainage holes in the bottom before filling them with potting mix.
How often should I water container tomatoes in peak summer?
During hot mid-summer weather ($90^\circ\text{F}+$), large potted tomatoes transpire massive amounts of water and may need to be watered once or even twice a day. Always verify soil moisture with your finger before watering.
Do container tomatoes taste as good as garden-grown tomatoes?
In many cases, they taste even better! Because you control the exact nutrient balance, soil composition, and water timing, container tomatoes often achieve incredible sugar concentrations and rich flavor profiles.

- How to Grow Microgreens Without Soil Indoors: Easy Home Method - October 5, 2026
- Microgreens vs. Sprouts: Key Differences, Nutrition, Safety, and Which One to Eat - October 5, 2026
- 10 Best Garden Tools For Weed Removal 2027 - October 3, 2026