Yes, you can sprout a peach seed in water, but it requires four specific steps:
-
Carefully crack open the hard outer pit to extract the almond-like seed kernel inside.
-
Soak the seed kernel in room-temperature water for 24 hours.
-
Cold-stratify the damp seed in your refrigerator for 6 to 10 weeks to break its natural dormancy.
-
Suspend the cold-treated seed over a jar of clean water using toothpicks until a taproot and stem sprout, then transfer it into well-draining soil.
Phase 1: Pit Selection and Cracking the Outer Shell
If you walk away with only one piece of advice from my years of trial and error, let it be this: never buy a commercial grocery store peach and expect its pit to thrive.
Many supermarket peaches are kept in cold storage for long periods or come from patented hybrid varieties whose seeds are either sterile or yield sour, unpredictable fruit.
Where to Source Your Pits
-
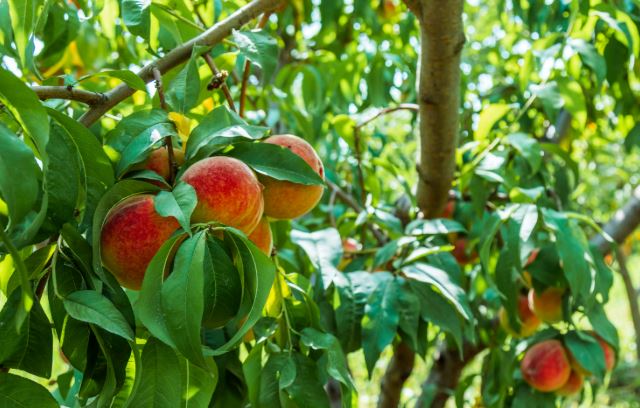
Farmer’s Markets & Local Orchards: These peaches are grown locally and are far more likely to adapt to your regional climate and chill-hour requirements.
-
Homegrown Peaches: If a neighbor has a thriving peach tree, ask for a ripe fruit.
-
Open-Pollinated Heirloom Varieties: Varieties like Elberta, Reliance, or TropicBeauty tend to produce stronger seedlings that closely resemble the parent tree.
How to Safely Extract the Seed Kernel
The hard, wrinkled object you hold after eating a peach isn’t the seed itself—it’s the endocarp (a hard wooden shell protecting the delicate seed inside). If you leave this shell intact, water cannot easily penetrate, and sprouting takes forever.
-
Clean the Pit: Wash away all sweet pulp. Fruit residue left on the shell attracts mold. Let the pit air-dry on a paper towel for 24 hours.
-
Crack the Shell Open: You need to crack the outer shell without crushing the soft, almond-shaped kernel inside.
-
The Vise Method (Best Option): Place the pit vertically in a bench vise. Slowly turn the handle until you hear a soft crack. Stop immediately and pry the shell open with your fingers.
-
Nutcracker or Pliers: Place the pit sideways between heavy-duty nutcrackers or channel-lock pliers. Apply gentle, incremental pressure along the seam.
-
Hammer (Use Caution): Stand the pit on its side on a wooden block and tap the edge lightly with a hammer.
-
Pro Tip from My Garden: Always crack 4 to 6 pits at a time. Not every seed kernel is viable; some will be shriveled or damaged during extraction. You want kernels that look plump, smooth, and light brown.
Phase 2: The 24-Hour Soak & Cold Stratification
Peach trees belong to the Prunus family, native to regions with distinct winters. In nature, a peach seed falls to the ground in late summer, sits through cold, damp winter soil, and sprouts when warm spring temperatures arrive. This natural process is called cold stratification.
If you skip cold stratification, your seed kernel will sit in water indefinitely without sending out a taproot.
+-----------------------------------------------------------------------+
|                       COLD STRATIFICATION PROCESS                     |
|                                                                       |
|  [Extract Kernel] -> [24-Hour Water Soak] -> [Damp Paper Towel Bag]   |
|                                                        |              |
|                                                        v              |
|  [Ready for Water Glass] <- [6-10 Weeks in Fridge] <- [35°F to 40°F]  |
+-----------------------------------------------------------------------+
Step 1: The Initial Water Soak
Take your extracted, undamaged seed kernels and drop them into a small glass of room-temperature tap water. Let them soak for 24 hours.
During this day-long soak, the dried seed coats absorb water, swell up, and signal to the inner embryo that it’s time to wake up. Discard any seeds that float to the top after 24 hours—they are usually hollow or unviable.
Step 2: Simulated Winter in the Fridge
-
Dampen a paper towel with water, then wring it out completely so it is barely moist (not dripping wet).
-
Sprinkle a pinch of cinnamon or spray a mild fungicide over the paper towel to prevent mold growth.
-
Place your soaked peach kernels on the paper towel, folding it over so they don’t touch each other.
-
Seal the paper towel inside a plastic zip-top bag and write the date on it.
-
Place the bag in the crisping drawer of your refrigerator (kept between 35°F and 40°F / 2°C and 4°C).
Keep the seeds in the fridge for 6 to 10 weeks. Check on them once every week. If the paper towel dries out, spray it lightly with water. If you spot fuzzy mold on a kernel, remove that seed immediately and replace the paper towel.
By week 6 or 8, you will often see a tiny white root tip (the radicle) poking out from the tip of the kernel. This is your sign that dormancy is broken!
Phase 3: Sprouting the Seed in Water (Windowsill Setup)
Once your seeds have completed stratification and shown signs of life, it’s time to move them to a water-filled glass setup to watch the root system develop.
The Toothpick Suspension Method
-
Select a small glass jar or a narrow-necked bottle. Fill it with fresh, filtered room-temperature water.
-
Hold your stratified peach kernel with the pointed tip facing downwards (this is where the root emerges).
-
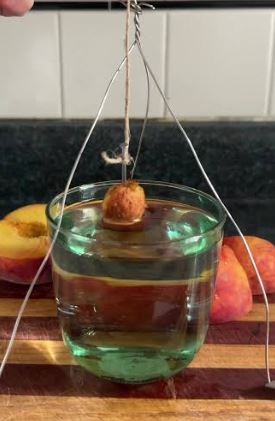
Gently insert 2 or 3 toothpicks about 2 millimeters into the sides of the seed kernel, just enough to anchor it.
-
Rest the toothpicks across the rim of the glass so that the bottom third of the seed kernel is submerged in water, while the top half remains exposed to air.
       \  Toothpick  /
  ======[=========]======  <- Jar Rim
         \ (Seed) /
~~~~~~~~~~~\-*-//~~~~~~~~~ <- Water Line (Bottom 1/3 Submerged)
            \ /
             |
             |  <- Root (Radicle) Growing Downward
Light and Temperature Needs
Place your glass setup on a warm windowsill that receives bright, indirect sunlight. Avoid putting it in harsh, direct midday heat, which can cook the water and kill the delicate new root.
-
Water Maintenance: Change the water every 2 to 3 days. Stagnant water starves the root system of oxygen and creates ideal conditions for root rot bacteria.
-
Root Growth: Within 7 to 14 days in water, you will watch the white taproot shoot downward toward the bottom of the glass, followed by a green stem pushing upward from the split seed halves.
Sprouting & Stratification Timeline
Here is a clear breakdown of what to expect at every stage of the process when growing a peach tree from a pit using water.
| Stage | Duration | Primary Objective | Key Action Required |
| 1. Pit Preparation | 1–2 Days | Extract clean, intact seed kernels from hard outer shells. | Crack shell gently with a vise or nutcracker; dry kernels. |
| 2. Hydration Soak | 24 Hours | Rehydrate the inner kernel and test seed viability. | Submerge kernels in room-temperature water; discard floaters. |
| 3. Cold Stratification | 6–10 Weeks | Break hormonal seed dormancy via simulated winter cold. | Store kernels in a damp paper towel in the fridge (35–40°F / 2–4°C). |
| 4. Water Sprouting | 2–3 Weeks | Develop a robust main taproot and initial green stem. | Suspend seed over water using toothpicks; refresh water every 48 hours. |
| 5. Soil Potting | 3–4 Weeks | Acclimate the water-grown root system into solid potting mix. | Transplant into a 1-gallon pot once taproot reaches 2 inches long. |
Phase 4: Transitioning Your Peach Seedling from Water to Soil
A peach tree cannot live in water forever. Water lacks the structural support, minerals, and oxygen levels necessary to sustain a wood-producing fruit tree past the early seedling stage.
Transfer your seedling to soil once the taproot is 1.5 to 2 inches (4 to 5 cm) long and the top stem begins unfolding its first set of true green leaves.
+----------------------------------------------------------------------+
|                     TRANSITIONING TO POTTING SOIL                    |
|                                                                      |
|  1. Choose a 1-gallon pot with wide drainage holes.                  |
|  2. Mix 60% quality potting soil with 40% perlite/coarse sand.       |
|  3. Pre-moisten the soil mixture thoroughly.                         |
|  4. Make a deep pilot hole in the center with your finger or a pen.  |
|  5. Lower the taproot straight down without bending or curling it.   |
|  6. Cover the seed kernel lightly, leaving the sprout above soil.    |
|  7. Keep moist in bright indirect light for 14 days before sun.      |
+----------------------------------------------------------------------+
The Transplanting Process Step-by-Step
-
Choose the Right Pot: Start with a deep 1-gallon (3.7-liter) container featuring prominent drainage holes at the base. Peach trees grow taproots fast and hate waterlogged roots.
-
Prepare the Soil Blend: Combine 60% high-quality organic potting soil with 40% perlite or coarse horticultural sand. This creates an airy, free-draining medium that prevents root rot.
-
Plant Carefully: Dig a vertical hole down the middle of the pot using your finger. Carefully remove the toothpicks from the seed, insert the taproot straight down into the hole, and gently fill in the soil around it. Do not bend or curl the taproot, as a crooked taproot stuns the tree’s growth permanently.
-
Initial Watering: Water gently around the base until liquid runs freely out of the bottom drainage holes.
-
Acclimation: Keep the potted seedling indoors in a bright window for 2 weeks before slowly introducing it to outdoor sun.
Regional Planting Guide: USA, UK, & Australia
Peach trees are deeply influenced by regional climate factors—specifically chill hours (the total accumulated hours between 32°F and 45°F / 0°C and 7°C during winter). Matching your germination schedule to your regional climate is vital for long-term success.
1. United States (USDA Hardiness Zones 5 to 9)
In the US, peach growing ranges from the high-chill climate of the Midwest and Northeast down to low-chill regions in Georgia, Texas, and Southern California.
-
When to Start: Start your cold stratification in late December or January. This timing lines up your water sprouting phase with early spring (March or April), making it easy to move seedlings outdoors without frost danger.
-
Variety Selection:
-
Northern/Midwest Growers (Zones 5–6): Look for high-chill varieties (800+ chill hours) like Reliance, Redhaven, or Polly.
-
Southern Growers (Zones 8–9): Choose low-chill varieties (200–400 chill hours) like TropicBeauty or Flordaprince.
-
2. United Kingdom (RHS Temperate Cool Maritime)
Growing peaches in the UK is totally achievable, but damp springs and late frosts pose a challenge. UK winters naturally provide plenty of chill hours, but outdoor spring temperatures remain cool longer.
-
When to Start: Start cold stratification in November or December so your seedling is ready to pot up indoors by February. Keep the young tree indoors or in an unheated greenhouse until late May when all danger of frost has passed.
-
Regional Tip: Rain spreads Peach Leaf Curl (Taphrina deformans), a fungal disease common across Britain. Grow your potted seedling under a porch roof, in a cold frame, or trained as an espalier against a sheltered, south-facing brick wall to shield it from direct spring rainfall.
-
Best Varieties for UK Climate: Peregrine, Rochester, or Duke of York.
3. Australia (Southern Hemisphere Seasons)
Growers in Australia experience reversed seasons compared to the US and UK. In southern states (Victoria, Tasmania, SA), winters are cool and wet, whereas northern states (Queensland, Northern NSW) stay mild and subtropical.
-
When to Start: Start cold stratification in May or June (Australian winter) so your seeds are ready to sprout in water by August, perfectly timed for planting out in early spring (September).
-
Regional Tip:
-
Southern Australia (Melbourne, Adelaide, Hobart): High-chill varieties perform brilliantly in full sun.
-
Subtropical Australia (Brisbane, Sunshine Coast): Choose low-chill, sub-tropical pit varieties (Flordaprince, Partridge Bare) that set fruit despite warm winters.
-
Regional Comparison Matrix
Use this breakdown to match your regional climate conditions, stratification schedules, and planting strategies.
| Region | Primary Climate Challenge | Ideal Cold Stratification Window | Best Outdoor Planting Season | Recommended Varieties |
| United States (Zones 5–7) | Late spring freezes & harsh winter lows. | Dec 15 – Feb 15 | Late Spring (April–May) | Redhaven, Reliance, Elberta |
| United States (Zones 8–10) | Insufficient winter chill hours. | Jan 1 – Feb 15 | Early Spring (March) | TropicBeauty, Flordaprince |
| United Kingdom | High rainfall leading to Peach Leaf Curl; low summer heat. | Nov 15 – Jan 30 | Late May (Post-Frost) | Rochester, Peregrine, Avalon Pride |
| Australia (VIC, TAS, SA) | Hot summers requiring consistent irrigation. | May 15 – July 15 | Early Spring (September) | Golden Queen, Elberta, Anzac |
| Australia (QLD, Northern NSW) | Tropical humidity & minimal winter chill. | June 1 – July 30 | August–September | Flordaprince, Tropic Beauty |
Troubleshooting Common Problems
Over the years, I have run into almost every issue you can encounter when sprouting stone fruit seeds in water. Here is how to handle the big three:
1. The Seed Kernel Keeps Growing Mold
-
The Cause: High humidity combined with residual fruit sugars or fungal spores on the seed surface.
-
The Fix: Rinse your extracted kernels in a diluted hydrogen peroxide solution (1 part 3% hydrogen peroxide to 10 parts water) for 2 minutes before soaking. Always change your jar’s water every 48 hours.
2. The Taproot Turns Brown or Black
-
The Cause: Root rot (Pythium) caused by stagnant, oxygen-depleted water or direct heat exposure.
-
The Fix: Healthy taproots should be bright white or cream-colored. If the tip turns brown, snip off the infected tip with sterilized scissors, move the setup to a cooler location, and replace the water daily.
3. The Seedling Grows Tall, Thin, and Weak (Etiolation)
-
The Cause: The sprouting seedling isn’t receiving enough direct sunlight.
-
The Fix: Move your glass setup to a brighter window or place a simple LED grow light 6 inches above the leaves for 12 to 14 hours a day.
Will a Tree Grown From a Pit Produce Good Fruit?
It’s time for an honest conversation about genetics. Almost every commercial peach tree you buy from a nursery is grafted. This means a branch from a proven fruit variety was joined onto a hardy rootstock.
  +-------------------------------------------------------------------+
  |                       GENETICS: SEED VS GRAFTED                   |
  |                                                                   |
  |   NURSERY TREE (Grafted)            SEEDLING TREE (From Pit)      |
  |   +-----------------------+         +-------------------------+   |
  |   | Exact Clone of Parent |         | Genetic Combination     |   |
  |   | Guaranteed Fruit Type |         | Wildcard / New Fruit    |   |
  |   | Bears Fruit in 2 Yrs  |         | Bears Fruit in 3-5 Yrs  |   |
  |   +-----------------------+         +-------------------------+   |
  +-------------------------------------------------------------------+
When you grow a peach tree from seed, the resulting tree is not a clone of the fruit you ate. It inherits genetic material from both the parent tree and whatever tree pollinated its blossom.
Here is what that means in practice:
-
The Fruit Outcome: Peach genetics are surprisingly stable compared to apples. About 80% of seed-grown peach trees produce delicious, edible fruit, though it may differ slightly in size, sweetness, or clingstone characteristics from the parent.
-
Time to Harvest: A seedling peach tree grown from a pit takes 3 to 5 years to flower and set its first real harvest, compared to 2 years for a store-bought grafted tree.
Even if the fruit turns out smaller than a commercial peach, you end up with a hardy, beautiful tree adapted specifically to your home environment from day one.
Frequently Asked Questions
Can I skip cold stratification if I live in a tropical climate?
No. Peach seeds require a period of cold temperatures (35°F to 40°F / 2°C to 4°C) to break their internal dormancy hormones. If you live in a tropical or warm climate, you must use your kitchen refrigerator to simulate this winter chill period for 6 to 10 weeks.
How long does it take to grow a peach tree from a pit in water?
The entire process takes approximately 10 to 14 weeks from extraction to soil planting. This breaks down into 24 hours of soaking, 6 to 10 weeks of cold stratification in the fridge, and 2 to 3 weeks suspended in water to grow an initial taproot and stem.
Can a peach tree live permanently in a water glass or vase?
No. Peach trees develop strong, woody trunk systems and deep taproots that require soil minerals, organic nutrients, and root anchorage. Water propagation is only an initial germination phase. The plant must be moved into a soil-filled pot once the root reaches 2 inches long.
Growing a peach tree from a simple pit using water is one of the most rewarding plant experiments you can do right at home. With a little patience during cold stratification and careful water management, you will transform an ordinary piece of kitchen waste into a healthy sapling ready for your garden.

- How to Grow Microgreens Without Soil Indoors: Easy Home Method - October 5, 2026
- Microgreens vs. Sprouts: Key Differences, Nutrition, Safety, and Which One to Eat - October 5, 2026
- 10 Best Garden Tools For Weed Removal 2027 - October 3, 2026